
Yes! Another BTS pattern 💜
This is a banner featuring the BTS logo with the text “BTS” underneath. This piece uses colorwork techniques, which I enjoy a lot because it’s fun to see the picture gradually appear as you add more rows. Another cool thing about this banner is that you can adapt it into anything square/rectangular-shaped. For example, you can turn this into a pillow by crocheting another panel of the same size and sewing the two panels together (putting a pillow insert between them). BE as creative as you’d like!
This logo, of course, does not belong to me and is property of BTS and Big Hit Entertainment / HYBE.
Notes:
- My finished banner measures 14.25 in long x 13 in wide.
- This pattern can be tricky if you are unfamiliar with colorwork, but I linked some resources below to help you out.
Materials:
- 2 colors of yarn (weight 4)
- Background-color (Yarn A) – I used purple
- Logo-color (Yarn B) – I used white
- Hook (5 mm)
Optional materials:
- Stitch marker, or something to mark the front vs. back side of your work
- Stick – I bought a thin wooden stick from Michaels and used a knife to cut it to my desired length.
- Yarn needle to thread yarn around the stick.
Abbreviations:
- Sc (single crochet)
- Ch (chain)
- Sl st (slip stitch)
Colorwork:
- Changing colors: Use the “seamless” method to achieve a clean change. Whistle and Ivy’s video tutorial (which also goes over colorwork methods and how to read a colorwork graph) shows examples of this.
- Colorwork method: You can use either tapestry or fair-isle method, whichever you feel more comfortable with. Whistle and Ivy’s video tutorial (same video linked above) teaches how to do both, but note that we will crochet into both loops (not just the back loops as she does in the video).
- If you are new to colorwork, I recommend experimenting with different methods to see what you prefer, and don’t worry too much about doing it “perfectly”! If you are happy with how things look, then that is all that matters. (Love yourself, as BTS would say.) Note that it is also normal for your colorwork to be slightly slanted — that is the nature of the single crochet stitch!
- Here is how I personally do colorwork if you are interested:
- I use a hybrid tapestry method, which I learned from one of Made by Hailey Bailey’s patterns. When I work along the “correct” side of the banner (the front side), I use normal tapestry method, carrying the inactive yarn color along and crocheting over it so it is hidden inside the stitches. When I work along the “wrong” side of the banner (the back side), I “float” the inactive yarn, similar to fair-isle method (but making sure to float the yarn on the wrong side of the banner). Then when I work on the correct side again on the next row, I crochet over that float to hide it inside the stitches. Overall this method helps to achieve a cleaner look on the front side.
- In addition: When I am actively using Yarn A (purple), I drop Yarn B (white) and do not carry it or float it at all. Then when it is time to switch back to Yarn B, I just pick up Yarn B wherever I happen to be. As a result, my background (purple) will be completely solid-color without any signs of the other color (white).


Pattern
Click here for the colorwork chart. We will start at the bottom right corner and work our way up, 1 row at a time, using the instructions below. Keep track of which side is the “correct” or front side of the banner — you may find it helpful to mark this side with a stitch marker. Another way to keep track is to note that you will face the correct side when working odd-numbered rows, and you will face the wrong side when working even-numbered rows.
With Yarn A, ch 41.
Row 1: Begin the colorwork chart (starting at the bottom right corner of the chart). Starting at the 2nd loop from your hook, sc along the chain (40 stitches). Ch 1 and turn.
Row 2: Put 1 sc into each stitch (40). Ch 1 and turn.
Row 3-50: Repeat Row 2, changing color according to the chart. The first color change occurs at Row 4. Your final stitch of Row 50 should be at the top right corner of the chart. Do not cut the yarn when you finish Row 50.

Border: We will now add a border to clean up the sides of the banner. First turn the banner over so that you are facing the wrong side. Then, working down the edge of the banner, put 1 sl st into the side of each row. When you reach the corner, put 2 sl st into the corner stitch and continue with 1 sl st into each stitch along the bottom edge. At the next corner, put 2 sl st into the corner stitch and continue with 1 sl st into the side of each row, working up the edge of the banner. You should now be at the top left corner of the banner. If you will add a stick to your banner: cut your yarn here, leaving a very long tail at least 5 times the width of the banner. If you are NOT adding a stick: put 2 sl st into the corner stitch and continue with 1 sl st into each stitch along the top edge of the banner, then finish off.
Optional blocking: Before adding the stick, you may want to block your banner to make it look even. I personally did not.
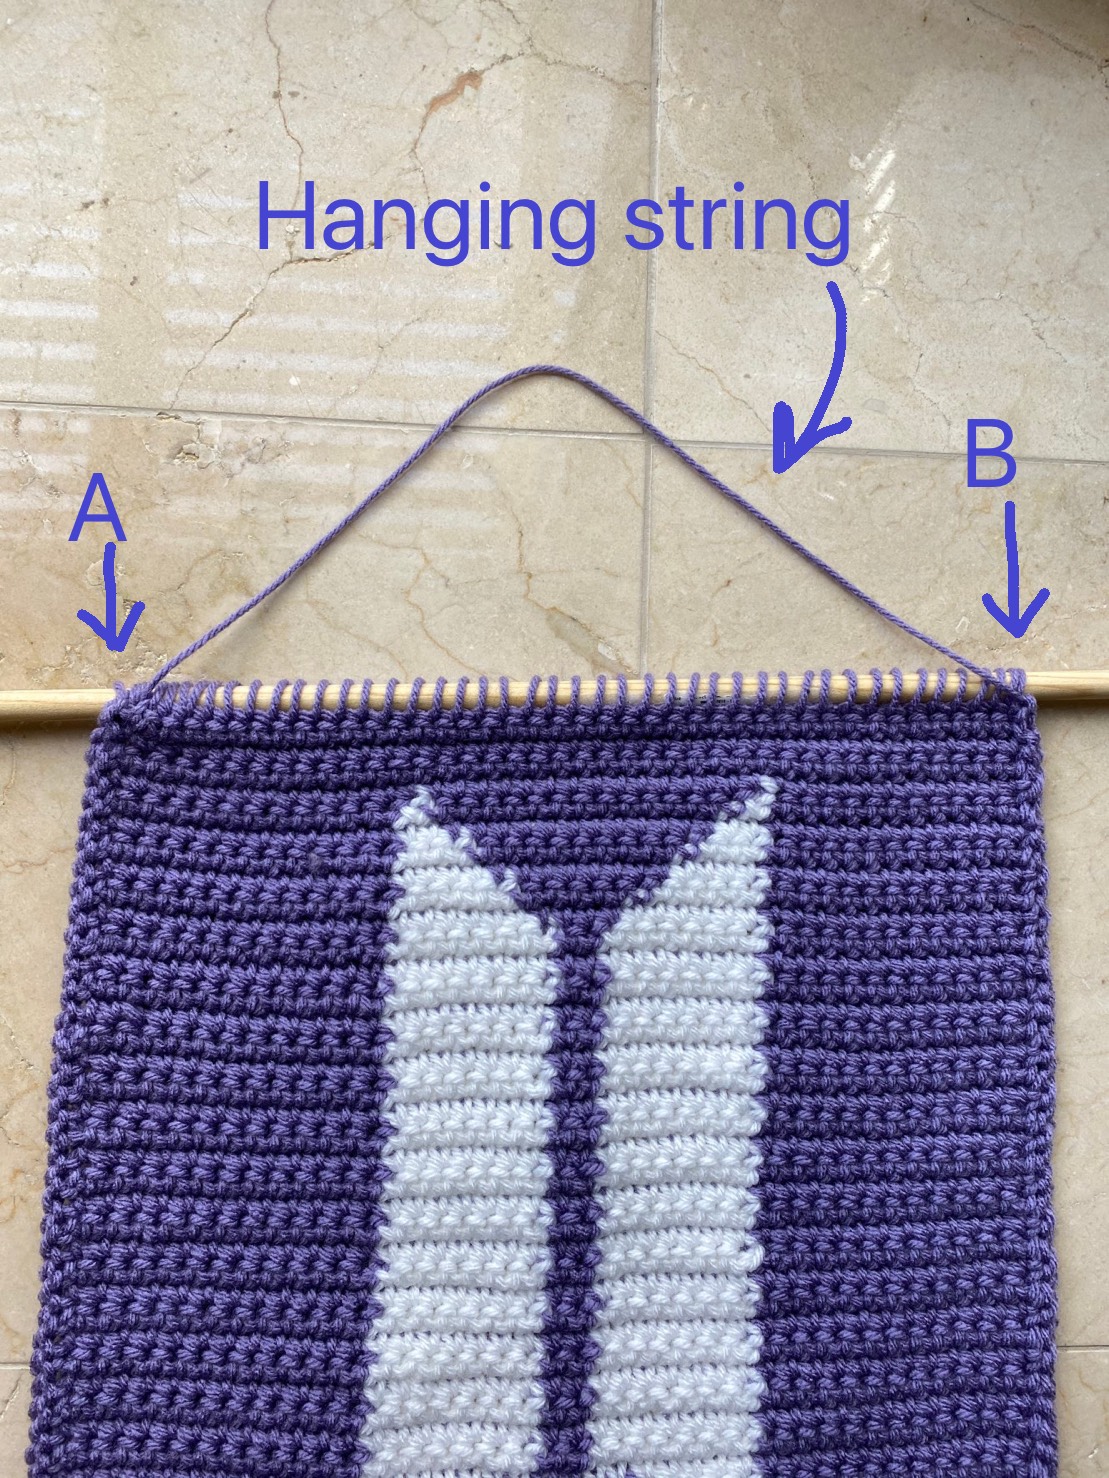
Attaching the stick: See photos below for reference. Lay your stick along the top of the banner and center it. Wrap the yarn tail around the stick. With each wrap-around, thread the tail through a stitch along the top of the banner. Keep your wrapping tight so the stick stays in place, and the loops around the stick look even. You may find it helpful to use a yarn needle. Creating the “hanging string”: When you are finished wrapping the stick, the remaining yarn tail will be used for the “hanging string” — the string from which you hang the banner. Bring the yarn tail back to the opposite corner of the banner, point A (the point where you began wrapping the stick). Adjust the length of the yarn tail to achieve your desired “hanging string” length. My “hanging string” length is about the banner width plus an extra inch. Tie some knots at Point A and finish off.


********************************************************
I hope you enjoy this pattern! Please let me know if you have questions or find errors in the pattern. All feedback is welcome and appreciated!
If you use this pattern, please tag me on Instagram (@JoselynCrochets) so I can admire your work! Please remember to credit me when sharing this pattern.

Reblogged this on Cintamani – Adventures in Spinning.
LikeLike
Thank you for sharing!
LikeLike
Pingback: Free pattern: BTS banner – Cintamani – Adventures in Spinning